GeeLark RPA Guide for Beginners ( 3 )
GeeLark RPA Guide
GeeLark RPA Guide for Beginners ( 1 )
GeeLark RPA Guide for Beginners ( 2 )
GeeLark RPA Guide for Beginners ( 4 )
Welcome back, my friend! Let’s get straight to the point. The learning objectives for this chapter are simple and focused:
- Learn how to create the most basic RPA template.
- Learn how to debug a template and view debugging logs.
Once you master these two skills, the tasks ahead will be much easier to handle.
If you haven’t gone through the first two chapters yet, feel free to check out my heartfelt advice for new learners:
GeeLark RPA Guide for Beginners ( 1 )
GeeLark RPA Guide for Beginners ( 2 )
1.Preparations
Open a cloud phone, launch the TikTok app, and log in to your account.
Find AutoX.js in the cloud phone and open it. If you’re unsure how to install it, you can revisit the “Exploring RPA” section for a quick review.
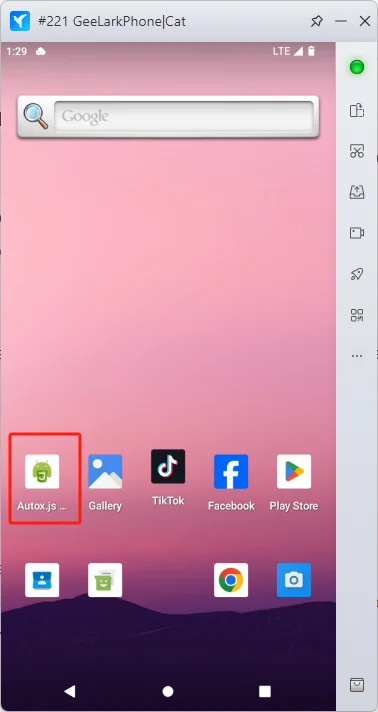
Enable Accessibility Services for AutoX.js
In GeeLark’s RPA functionality, AutoX.js primarily assists in locating elements within the interface. Follow these steps to enable the accessibility services for AutoX.js:
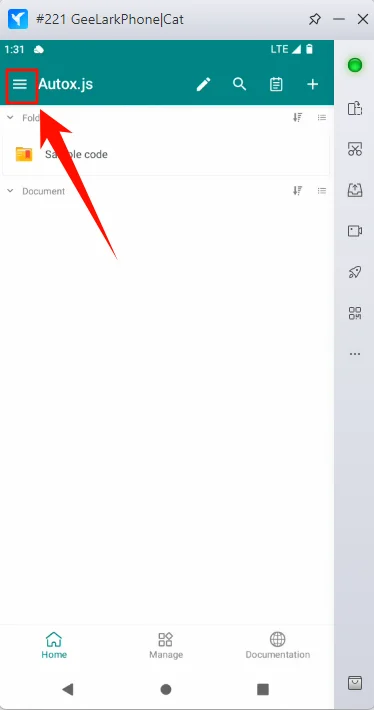
Step 1: Access the Settings Menu
Open AutoX.js, then tap the icon in the top-left corner to enter the settings menu.
Step 2: Enable Accessibility Services and the Floating Window
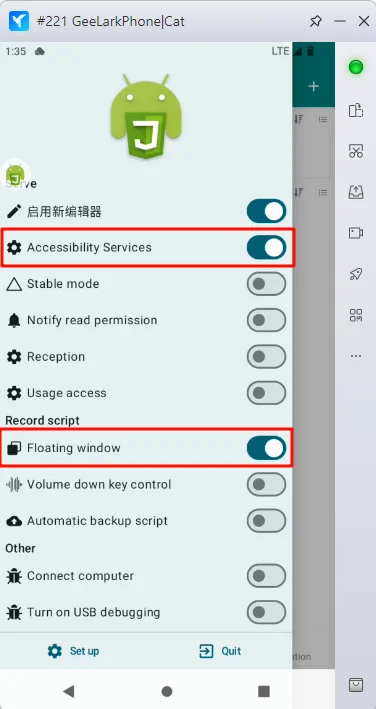
Note:
- If you have previously configured AutoX.js following these steps but do not see the floating icon, simply click “Floating Window” again to re-enable it.
- Sometimes, the floating icon may disappear after restarting the cloud phone. In this case, follow the two steps above to set it up again.
2.About the UI
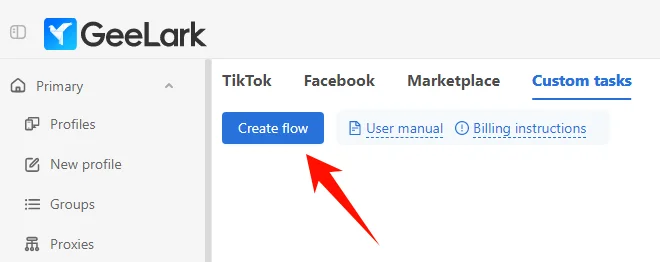
In the “Custom tasks” , click “Create Flow”.
Once you enter the “Task Flow” interface, let’s see the three main sections.
Don’t worry if it feels overwhelming at first—take your time, and I’ll guide you through everything step by step.
Section 1:
This is where you select all the RPA actions, such as clicking a button, long-pressing a button, scrolling a page, etc. You’ll need to add these actions to Section 3 to create a complete RPA template.
Section 2:
Here, you can set the task (RPA template) name, add a task description, debug the RPA template, and view debugging logs.
Section 3:
This is the GeeLark RPA template editing area, where you combine various action options to build your GeeLark RPA template.
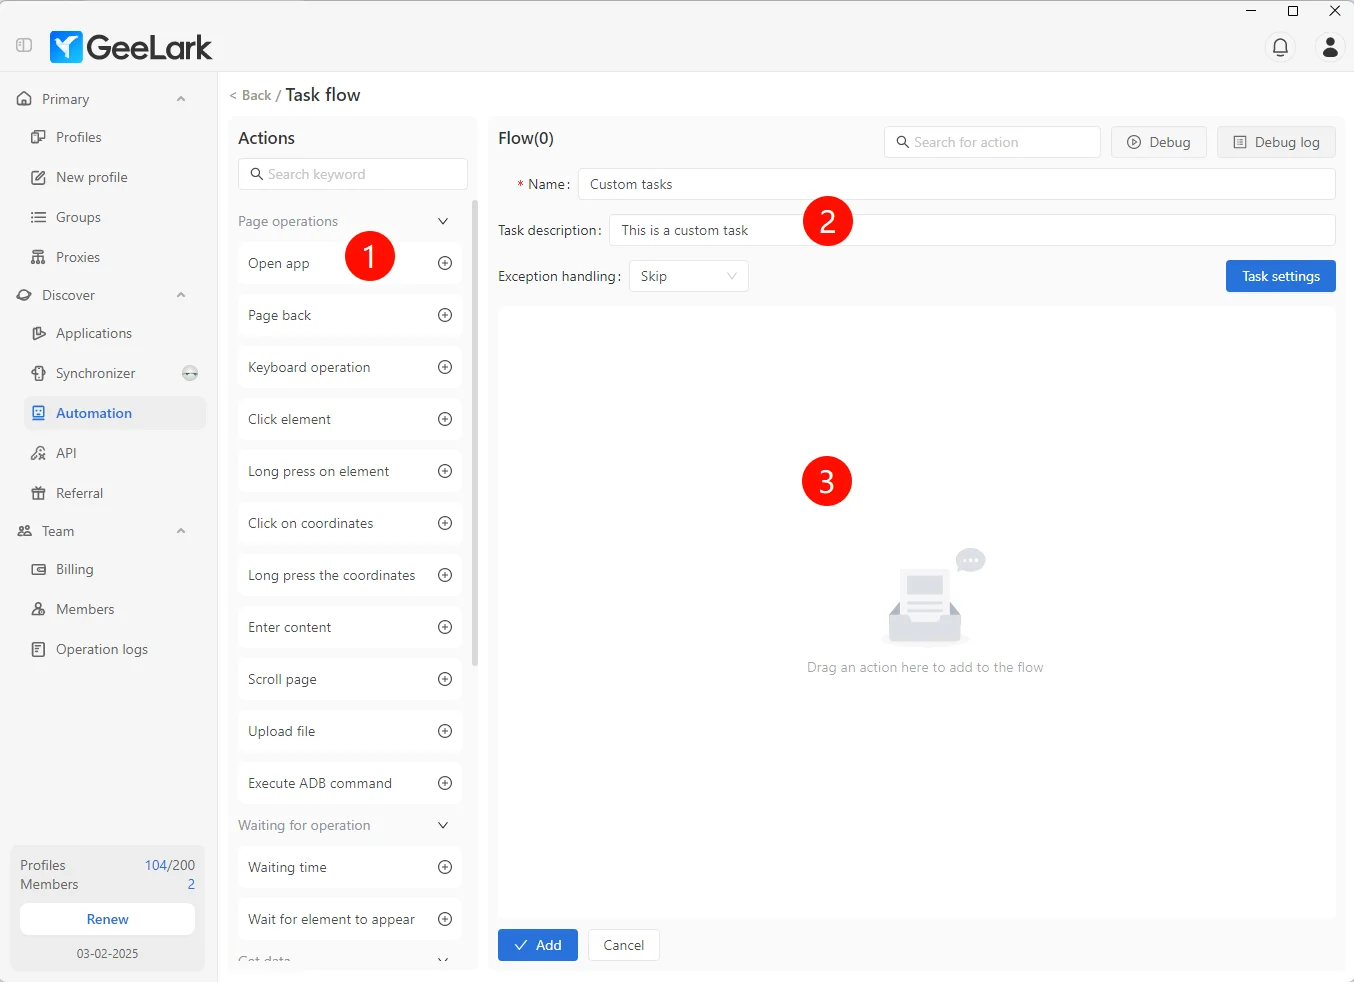
Please fill in the Task Name and, optionally, the Task Description.
- Leave “Exception Handling” as default.
- For now, you can skip “Task Settings”.

3.Open app
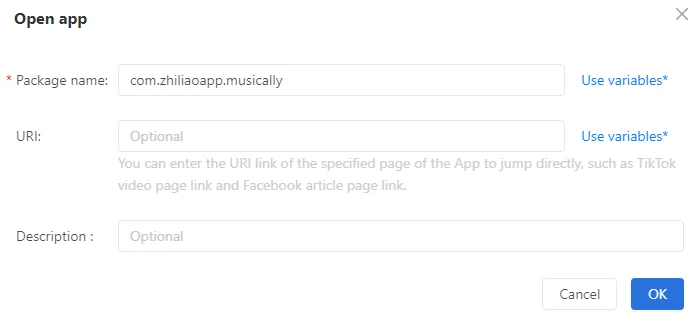
This is the first step in creating an RPA template. The RPA flow needs to open an app to execute tasks. If this step is not configured, the RPA won’t know which app to target for execution.

| Option | Description |
| Package Name | Select the app you want to open. You can learn how to fill this in later in the guide. |
| URI | Used to open a specific page within an app. For example:TikTok: https://www.tiktok.com/@XXX/video/7423XXXXXXXXXX2Facebook: https://www.facebook.com/XXXX/posts/pfbid09PZXXXXXX |
Steps to Follow:
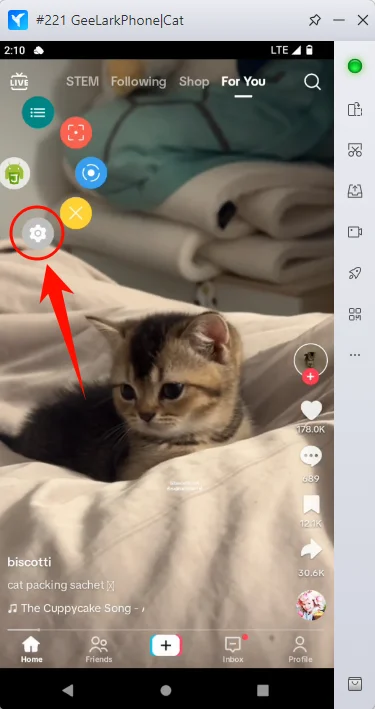
1.Open TikTok, tap the floating AutoX.js icon, and then click the Settings button (yes, the one that looks like a gear—go ahead, tap it!).
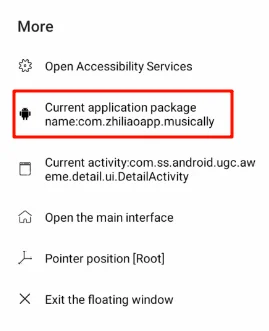
2.In the pop-up menu, click “Current application package name” to copy the package name to your computer’s clipboard. At this point, the clipboard will contain: com.zhiliaoapp.musically. If you select a different app, the package name will be different.
3.Drag the “Open app” action to the editing area on the right (or click the “+” button next to it). Then, paste the package name you copied from AutoX.js into the “Package name” field and click “OK”. If pasting (Ctrl+V) doesn’t work, go back and repeat Step 2 to ensure the package name is correctly copied.
4.Waiting Time

Use Case:
Adding a waiting time ensures there is enough delay between each operation, allowing the RPA bot to mimic more natural behavior and avoid appearing overly mechanical.
Steps to Follow:
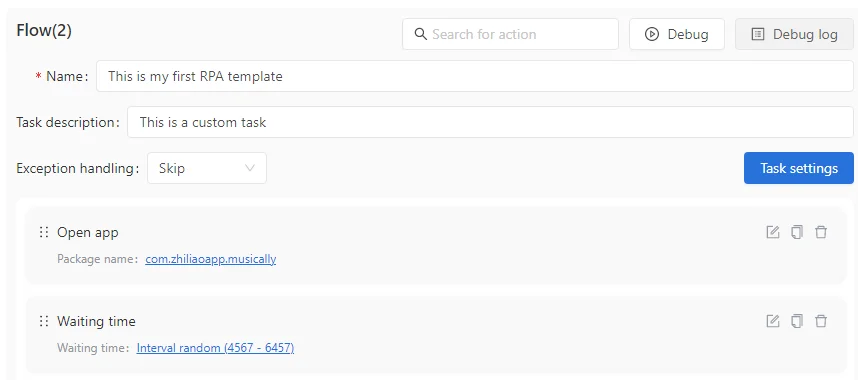
Drag the “Waiting time” action to the editing area. You can choose between “Fixed value” and “Interval Random” as the waiting time options.
- For example, when opening an application, it’s recommended to wait around 5 seconds before executing the next step. Adding waiting time can significantly improve the success rate of RPA execution.
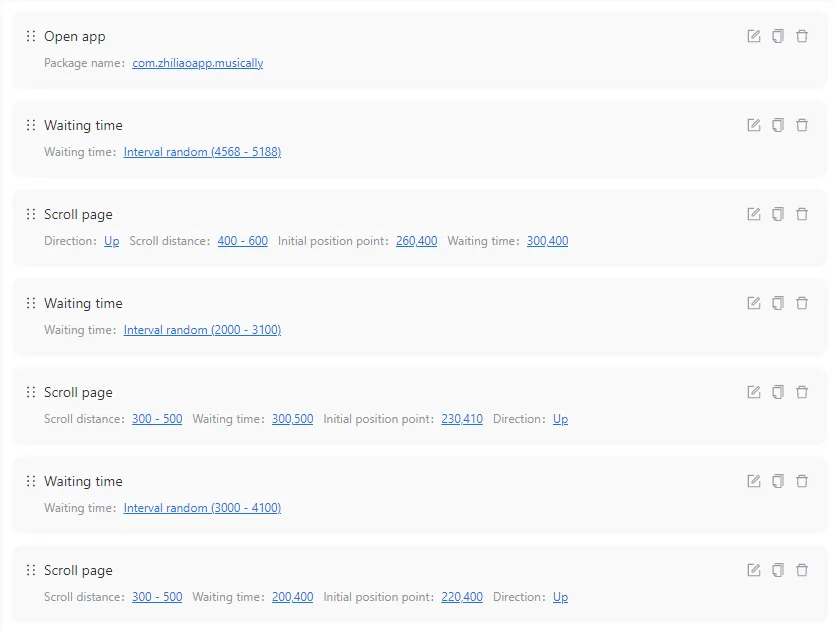
5.Scroll Page
Use Case:
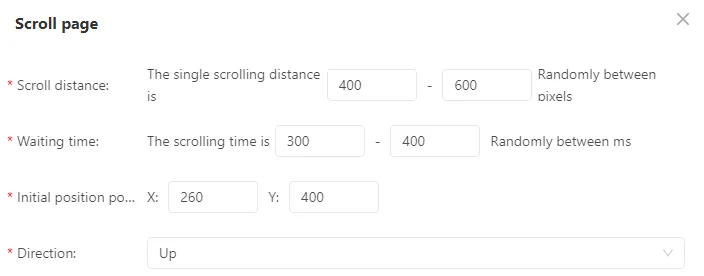
Scroll up, down, left, or right on the screen to reveal more content. This action is commonly used in scenarios where you need to browse through lists, load additional data, or locate specific items.
Options:
- Scroll distance: Defines the distance the page scrolls each time, measured in pixels.
- Waiting time: Specifies the duration of each scroll action in milliseconds (ms), which determines the scrolling speed.
- Starting Position: Sets the starting point for the scroll, such as X:260, Y:400 on the page.
- Direction: Select the scroll direction, including up, down, left, or right.
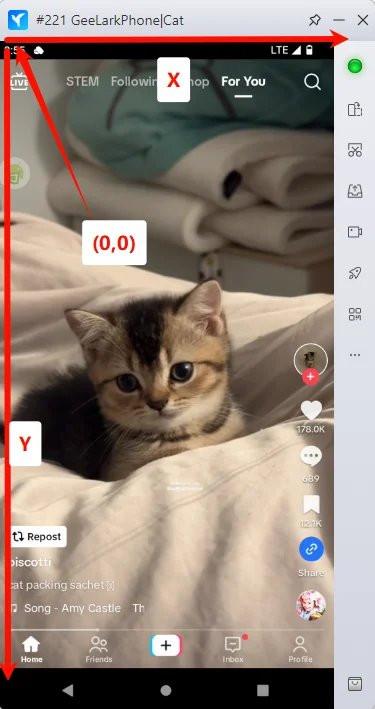
You can mimic a real user’s scrolling behavior by following a sequence like this: Scroll Page → Wait → Scroll Page → Wait → Scroll Page.
Additionally, the scroll distance range, starting position, and scroll time range can all be set differently for each scroll action, adding more variability to simulate human-like interactions.
6.Page back

Use Case:
This action allows you to return to the previous page, similar to clicking the navigation back button.
Next, add the “Page back” action to the flow. Now, a simple and basic RPA template is complete.
The workflow of this RPA template is as follows:
- Open TikTok
- Wait for a few seconds
- Scroll the page 3 times, pausing for a few seconds after each scroll
- Finally, return to the phone’s home screen
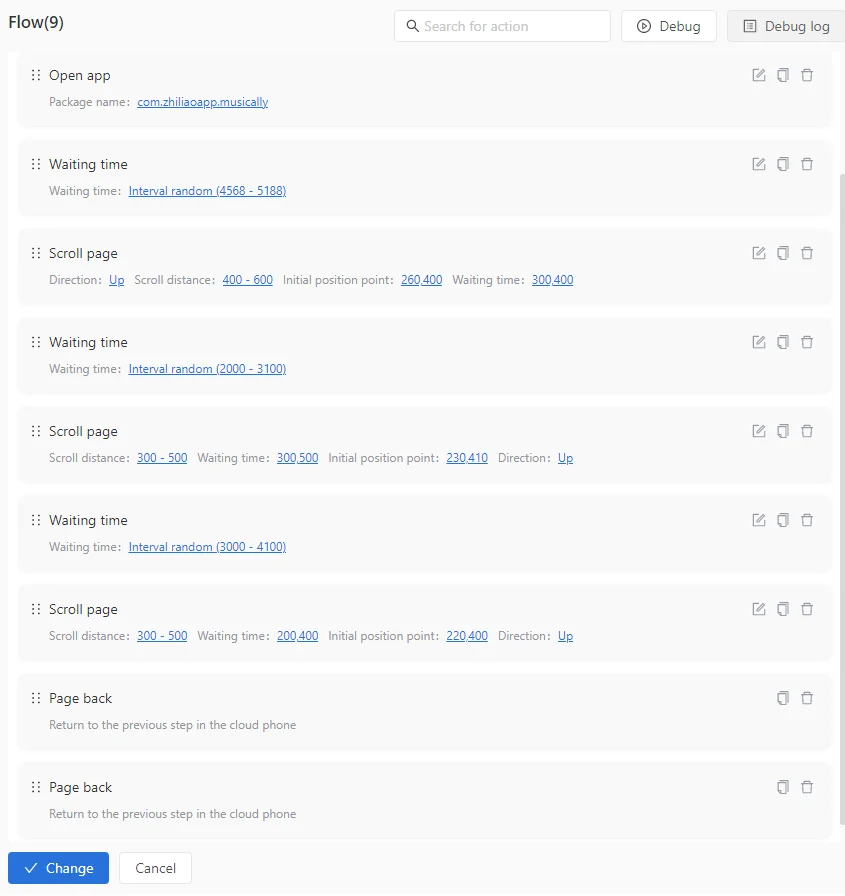
(Since I need to press the back button twice to return to the phone’s home screen, I added two “Page back” actions here. Generally, if you only need to return to the previous page, adding one “Page Back” action is sufficient.)
So, can this RPA template run smoothly? Will there be any unexpected issues? Next, you’ll need to use the “Debug” feature to test and fine-tune the template. Keep reading—you’re very close to success!
7.Debugging the Template
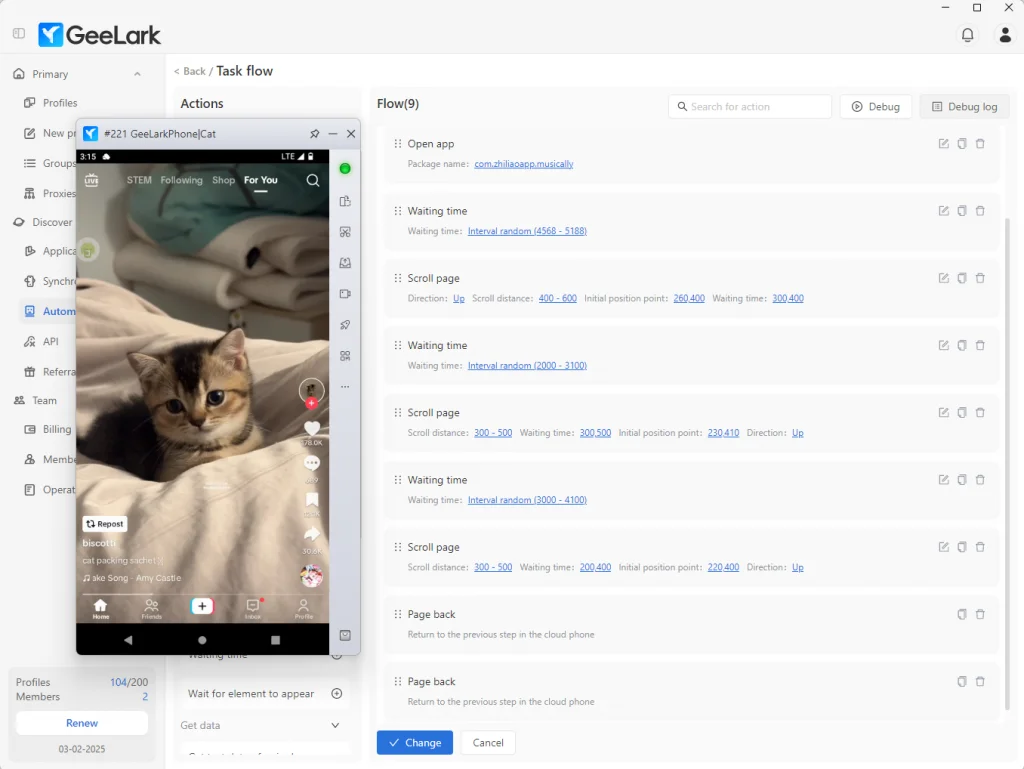
Before assigning the RPA task to multiple accounts, it’s essential to debug the RPA template to check for any potential issues. To make debugging easier, it is recommended to open the cloud phone and observe the template’s execution process.
Click the “Debug” button to enter the cloud phone selection interface.
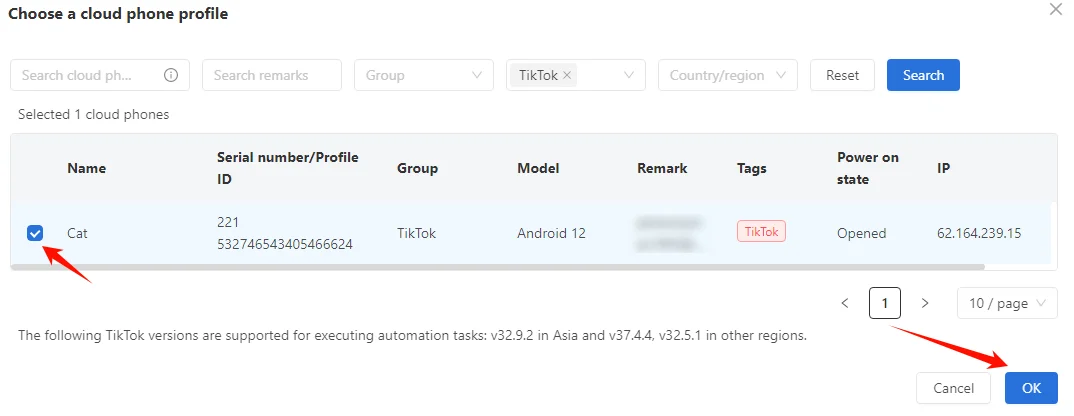
Select the currently active cloud phone and click “OK”. After a short moment, the RPA will begin executing tasks according to the template you’ve created.
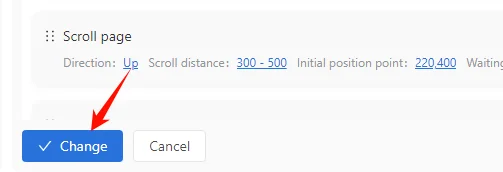
If you think the template doesn’t require any modifications, click “Add/Change” to save your first self-created RPA template.
Congratulations! You’ve successfully completed the beginner level of RPA!
So far, you have mastered 30% of the RPA functionalities.
To further strengthen your skills in creating RPA templates, you can continue practicing by using the beginner-level features you’ve learned to build more RPA templates.
GeeLark RPA Guide for Beginners ( 1 )
GeeLark RPA Guide for Beginners ( 2 )
GeeLark RPA Guide for Beginners ( 4 )
GeeLark RPA Guide for Beginners ( 5 )


