GeeLark RPA Guide for Beginners ( 4 )
GeeLark RPA Guides
GeeLark RPA Guide for Beginners ( 1 )
GeeLark RPA Guide for Beginners ( 2 )
GeeLark RPA Guide for Beginners ( 3 )
Goals
- Learn how to locate elements, e.g. specific buttons, input fields, and other elements on a page, using GeeLark RPA.
- Understand how to use various tap and long-press actions to complete basic interactions on a page within the GeeLark RPA framework.
- Get familiar with the settings for different operation options in GeeLark RPA and adjust task templates flexibly.
Study Tips
- This part includes a lot of content and is very important. It’s best to focus on learning one action at a time.
- Start by learning how to locate elements: this is the foundation for all actions like tapping and typing.
- Use the exercise in each chapter to practice hands-on. Don’t rush to learn everything at once. Take your time, practice patiently, and embrace trial and error—it’s a great way to gain experience with GeeLark RPA.
1.Elements
In this tutorial, I will primarily use the term “element” to describe the components of an app interface. However, you should know that the term “widget” is more commonly used in programming contexts, and both terms share the same meaning. I will only use “widget” when discussing programming-related topics or functions within AutoX.js and GeeLark RPA.
In the diagram below, you’ll see six types of elements:
1.Text: A TextView widget used to display labels or informational text.
2.Image: An ImageView widget used to display images or icons. 3.Composite Widgets: Buttons that combine icons and descriptive text.
4.Input Field: An EditText widget that allows you to enter text.
5.Button: A Button widget typically used to trigger actions like “Login” or “Submit.”
As you deepen your understanding of RPA and analyze more app interfaces, you’ll encounter many more types of widgets beyond these six. But for now, let’s start with the basics.
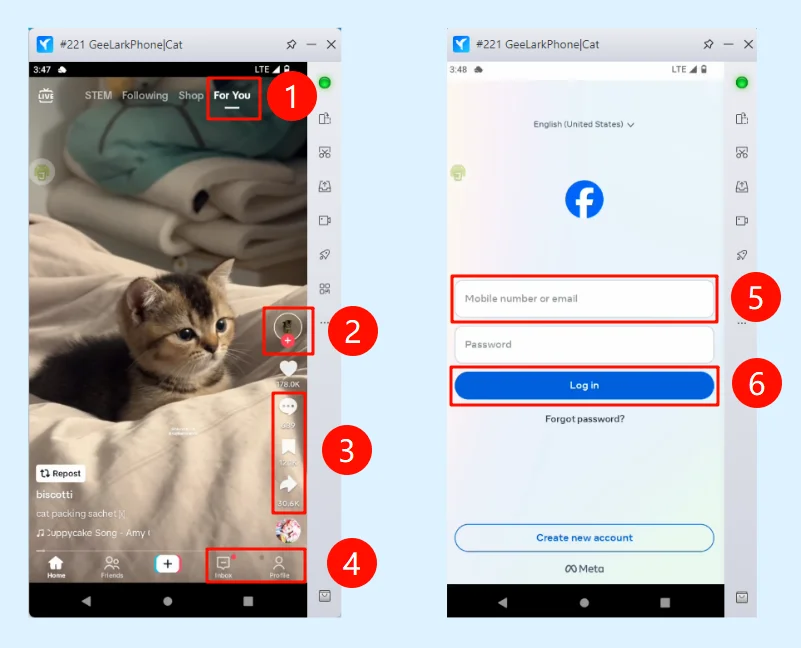
When creating GeeLark RPA templates, we use text, attributes, or coordinates to locate elements:
- By Text: This is the simplest way. It works by finding elements based on their visible text. The text must be unique, like “Shop” or “Following,” for this method to work.
- By Attributes: This method uses an element’s attributes, like an ID or a specific value, to find it. It’s useful when the element doesn’t have visible text, such as an icon.
- By Coordinates: This method finds elements based on their position on the screen. It works in most situations and is very flexible.
2.Element Attributes
Start your cloud phone, open TikTok, and ensure AutoX.js is running in floating window mode. If you’re unsure how to set up AutoX.js, refer to the earlier part for instructions.
Step 1: Tap the AutoX.js floating window icon, then select the blue button labeled “Layout Analysis”. Next, choose “Layout Range Analysis”.
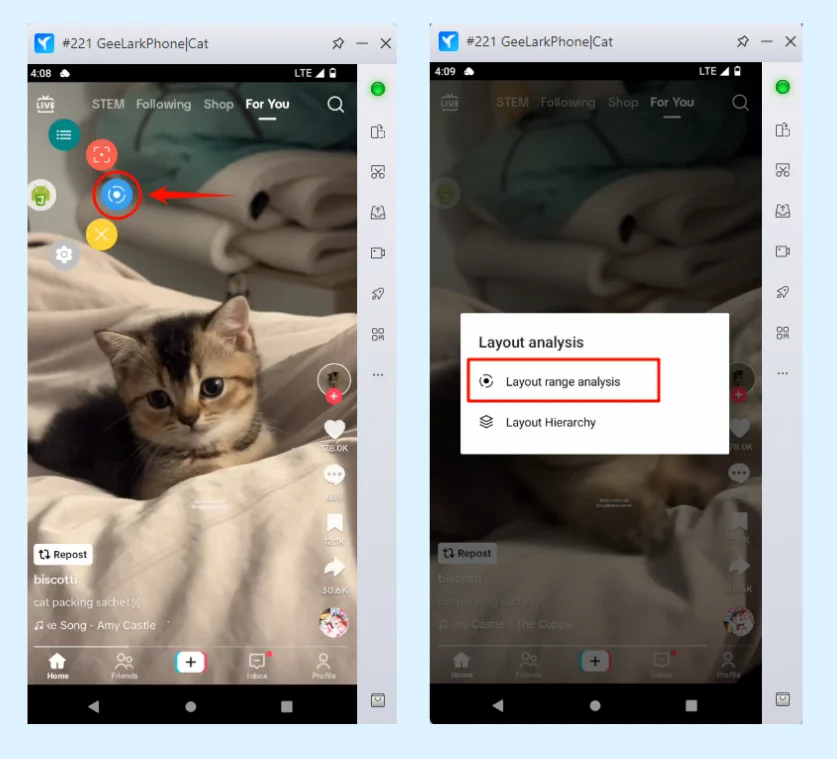
Here, you’ll see green boxes appear on the screen, indicating that AutoX.js has successfully identified the elements on the interface.
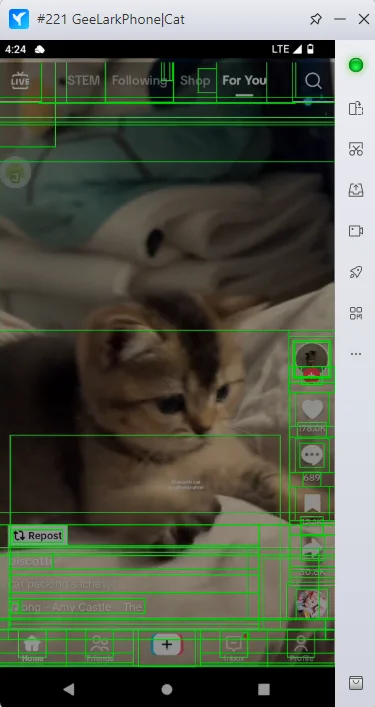
Step 2: Tap on an element, such as “Shop”, and select “View Control Information” from the menu.
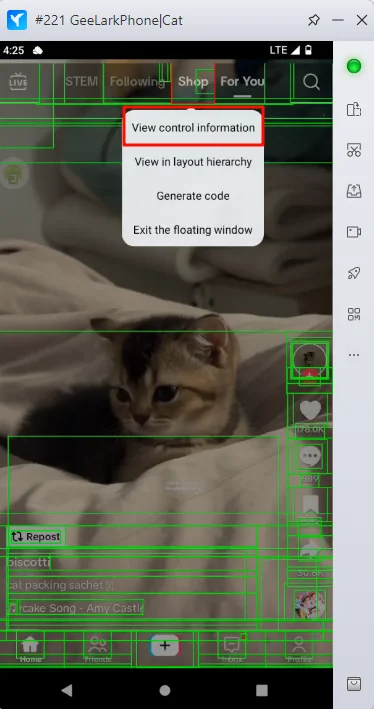
Step 3: Each element has different attributes. Below are some commonly used ones and their descriptions:
- Class Name (className): Indicates the type or style of the element, such as its control category.
- Description (desc): A short “label” or “summary” of the element. However, not all elements have a description, so the
descattribute might be empty in some cases. - Full ID (fullId): Like an “ID card” for the element. If the element has a unique ID, this attribute serves as its identifier, allowing GeeLark RPA to locate it precisely. However, be cautious—sometimes multiple elements on a page may share the same full ID.
- Text (text): The text displayed on the element, commonly found on buttons or labels, such as “Login,” “Create New Account,” or “Shop.”
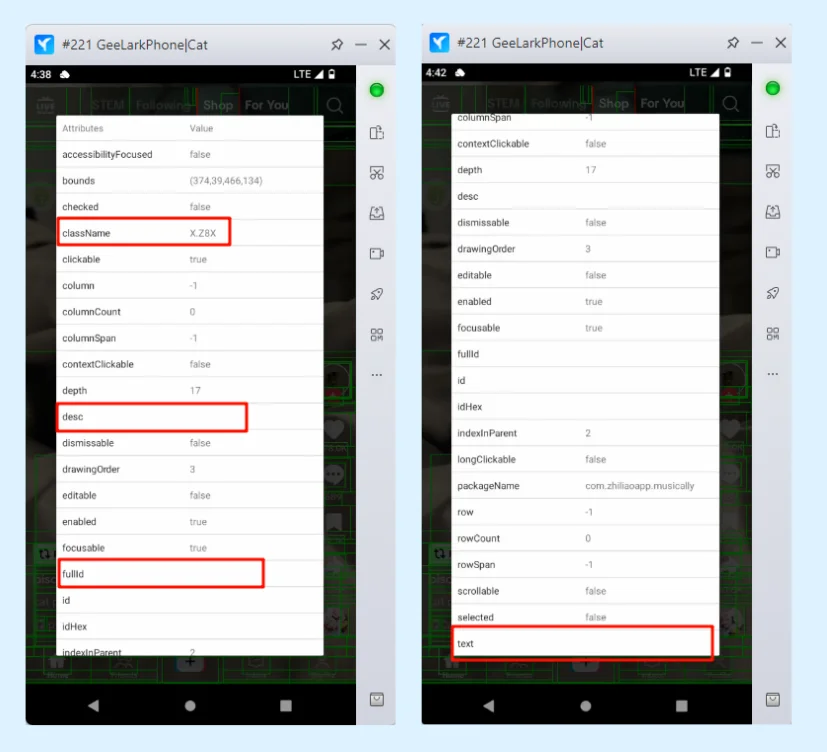
You can explore different pages, tap on various elements, and check their attribute values to better understand how they work.
3.How to Locate Elements
3.1 Text-Based Method
Let’s start with a simple example by using text (an attribute) to locate an element. Go back to the TikTok home page, where you’ll notice there are roughly three areas with text. Next, we’ll try clicking the buttons in these three areas to get familiar with how the text attribute works.
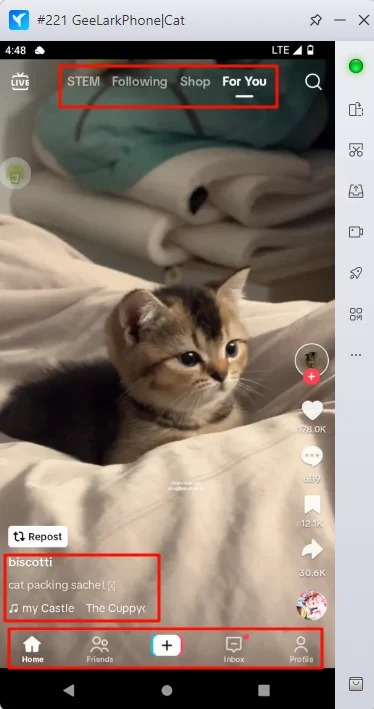
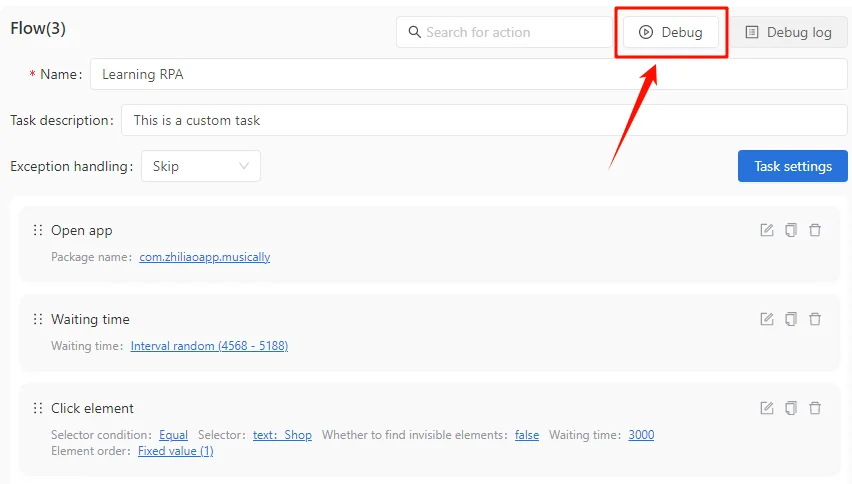
Step 1: First, create an GeeLark RPA template. Add steps to open the TikTok app and include a wait time. (If you’re not familiar with these steps yet, consider starting with this tutorial.)

Step 2: Add a “Click element” action. Set the selector to “text” and enter the text of the element, such as “Shop,” “Profile,” or “Inbox.” Finally, click “OK” to save.
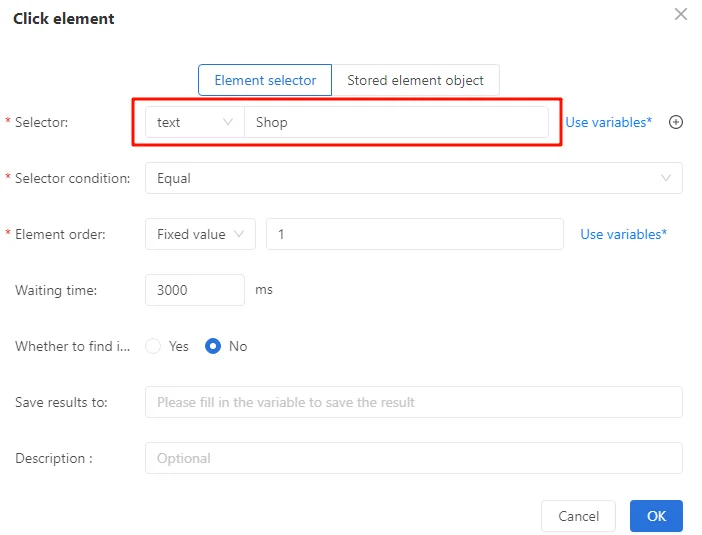
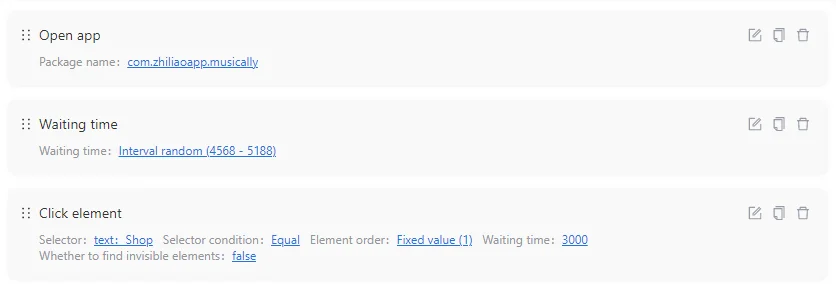
Step 3: Debug the template to see how it runs.
Exercise:
Practice clicking on various text elements on the TikTok home page to get more familiar with the text-based locating method.
After running the task each time, manually reset the interface back to the TikTok home page. This ensures that every test starts from the initial screen, making it easier to observe how the RPA executes the task.
3.2 Click Element
We just used the “Click element” option in GeeLark RPA. Now, let me provide some explanations about this option.
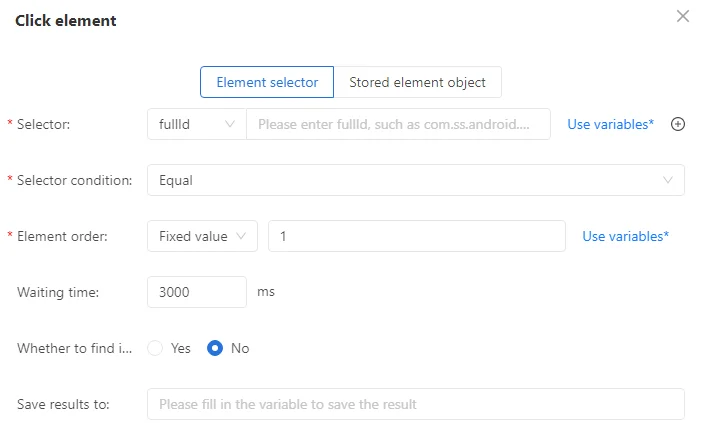
Use Case:
The “Click Element” option in GeeLark RPA is used to simulate clicking on a specific UI element within an app, such as a button, link, or image.
Don’t feel overwhelmed by all the available options just yet. At your current level, simply focus on learning how to choose the right selector and correctly fill in the attribute values. For now, you can leave the other settings as default. As you progress and learn more advanced techniques with GeeLark RPA, you’ll be able to customize these settings as needed.
| Option | Description |
| Selector | fullId: Uses the unique ID of the element for precise location. text: Locates elements based on displayed text, suitable for elements with clear visible text. desc: Locates elements based on their description, ideal for icon-like controls. className: Locates elements by their class name. This works only if the class name is unique, and it’s often used in combination with other selectors. |
| Selector condition | Equals: Matches the attribute value exactly, suitable for elements with fixed values. Contains: Matches part of the attribute value, suitable for elements with dynamic text or descriptions. |
| Element order | Fixed Value: Selects the specific target element by its position in the list of matching elements. Interval Random: Randomly selects an element from a specified range of matching elements. |
| Waiting time | Specifies the maximum time (in milliseconds) to wait while searching for the target element. If the page loads slowly, increase this wait time (e.g., 5000ms). |
| Whether to find invisible elements | Controls whether the action can target elements that are not visible on the screen (e.g., hidden elements or content that requires scrolling). Select “Yes” to click buttons that require scrolling to become visible. Select “No” to interact only with elements currently visible on the screen. |
| Save results to | The primary purpose is to record whether the click action was successful. The result is stored in a boolean variable:true: Click was successful.false: Click failed. |
| Notes | Add comments to document the purpose or function of this step, making it easier to review or debug later. |
At this point, you might be wondering: “Hey, what about those icons without any text? How do I click on them?”
Don’t worry! That’s because you haven’t learned the Attribute-Based Locating Method yet. Next, I’ll guide you step by step to master it in GeeLark RPA.
3.3 Attribute-Based Method
I’ll teach you how to use the Attribute-Based Method through a simple RPA template in GeeLark RPA.
The task is:
- Open the TikTok app.
- Wait for a few seconds.
- Like the current video.
By following this hands-on example, you’ll easily grasp the core usage of the Attribute-Based Method.
Step 1: Click the AutoX.js floating icon, then click the blue “Layout analysis” button and select “Layout Range analysis”.
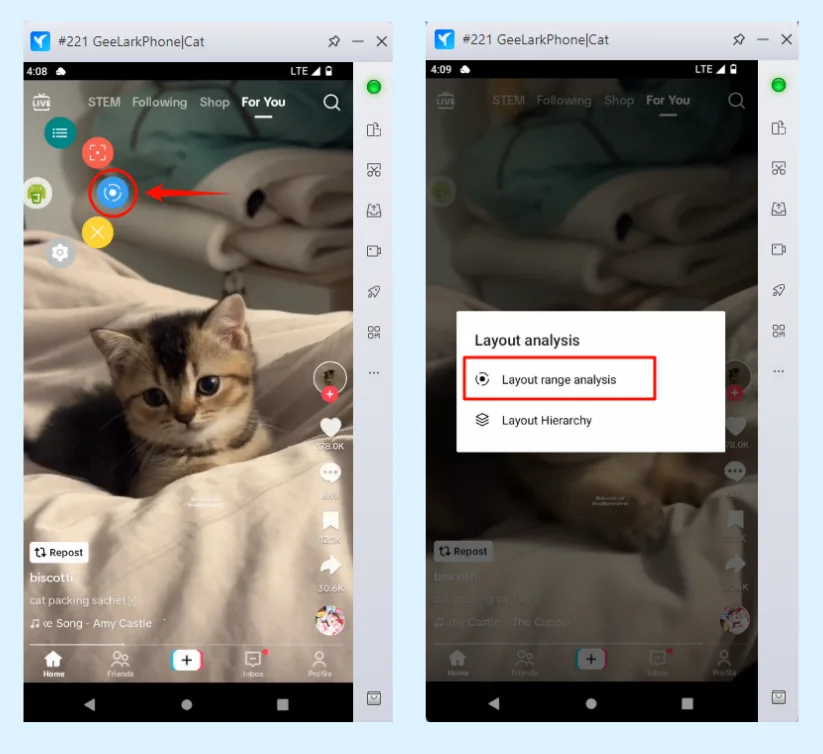
Step 2: Click the “Like” icon and select “View in layout hierarchy” from the menu.
At this point, you’ll see a list of widgets details on the screen. Plus, a red box will appear around the “Like” button. Just to clarify—this red box isn’t something I’ve drawn, but is automatically added by AutoX.js. It’s there to highlight the control you’re currently looking at. Any widgets inside this red box are the ones we’re focusing on for analysis.
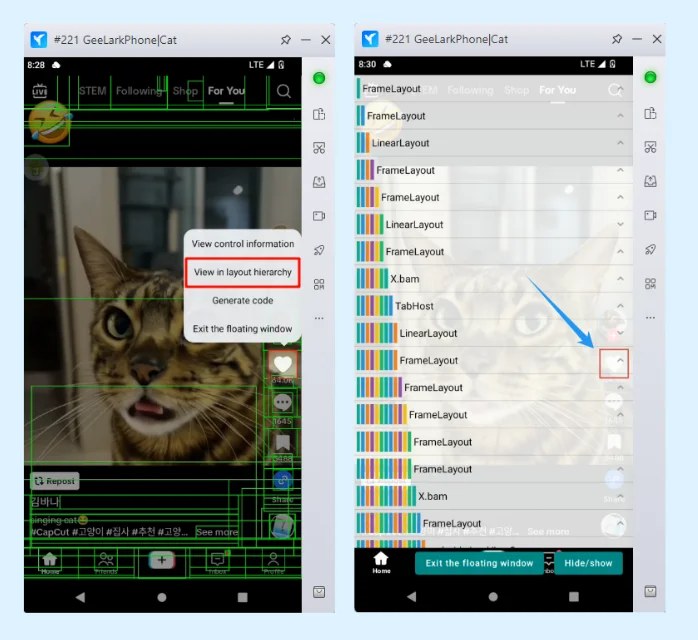
I know this might feel a bit confusing the first time you see this screen, so I’ll go into a bit more detail to help you out.
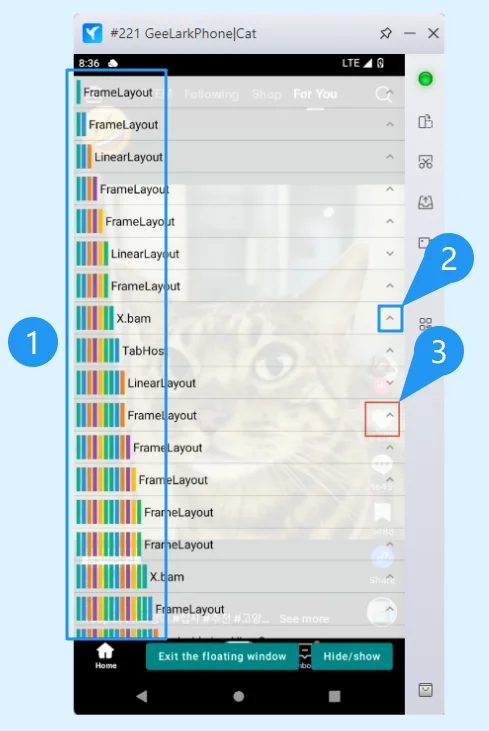
1.Vertical Bars and Hierarchy The vertical bars represent the hierarchical relationship of UI elements. Each additional vertical bar indicates that the element is nested at a deeper level. For example, at the top level, you’ll find the FrameLayout, and below that, the child element, LinearLayout.
2.Collapse/Expand Button Use the collapse or expand button to view or hide the child elements of a selected item. By expanding or collapsing, you can easily understand the element’s relationship within the hierarchy.
3.Element Highlight Box When you select an element in the “Layout hierarchy”, a red box will automatically highlight the corresponding area of that element on the actual app interface. This shows you the exact location of the selected element in the app, helping you quickly confirm that you’ve chosen the right widget.

Friendly Reminder
When using attribute-based methods in GeeLark RPA, you may often encounter nested elements. If the element you’re inspecting doesn’t show any values, it means you might not have selected the right element. Try using the Layout Hierarchy instead. The element you’re looking for may be nested deeper within the structure.
Step 3: Scroll down the screen to find the widget information for the “Like” button. When you see a widget with a darker color than the others, it means that’s the currently selected widget, like the one corresponding to the “Like” icon. This highlighting helps you quickly locate the target widget.
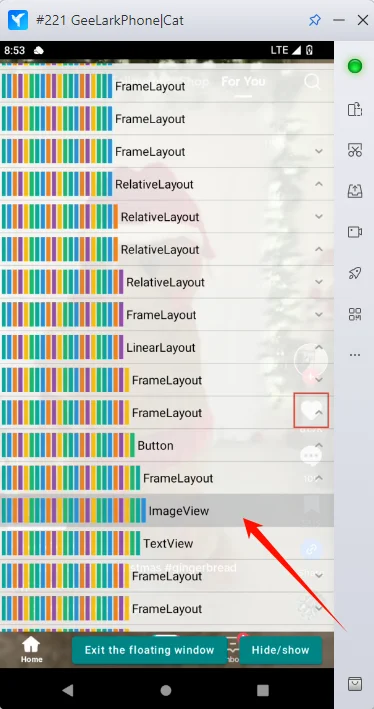
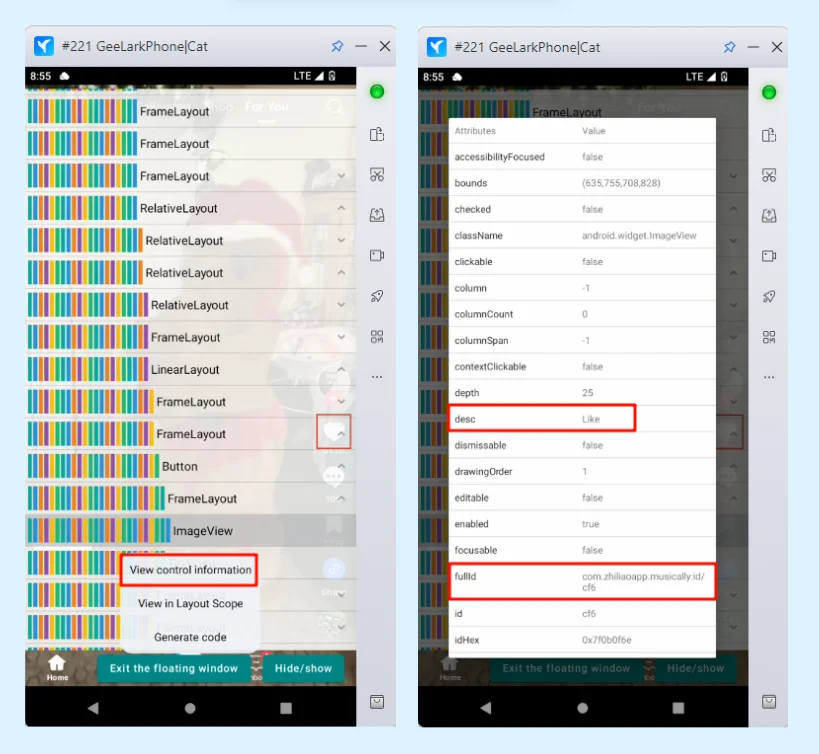
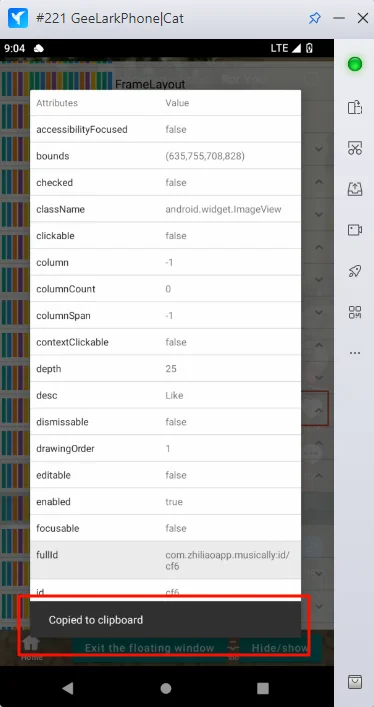
Step 4: Long press the highlighted “ImageView” and select “View control information”. In the popup properties window, you’ll see the following information:
- desc attribute value: Like
- fullId attribute value: com.zhiliaoapp.musically:id/cf6 (Note: The value of fullId may vary depending on the device or version, so please refer to what you see on your device.)
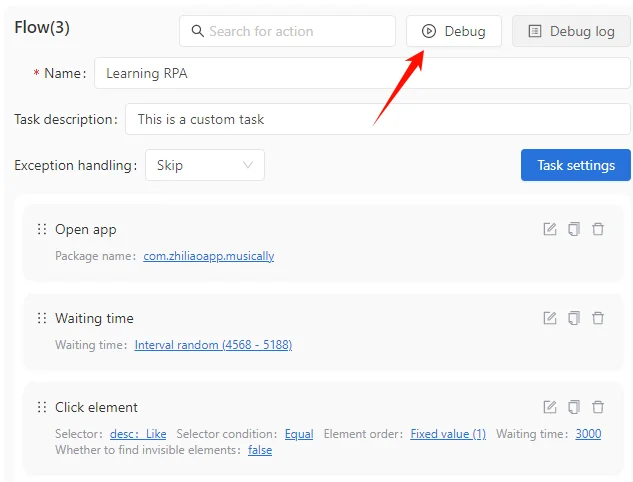
Step 5: Set up the simplest test flow by selecting the “Click element” action.
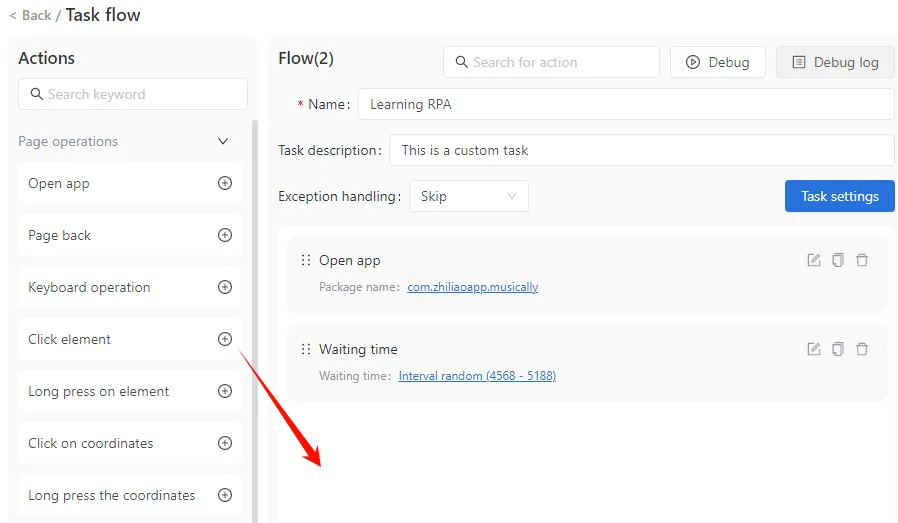
When using the “Click element” action in GeeLark RPA, you can set the selector to either fullId or desc, and enter the attribute values you found in AutoX.js.
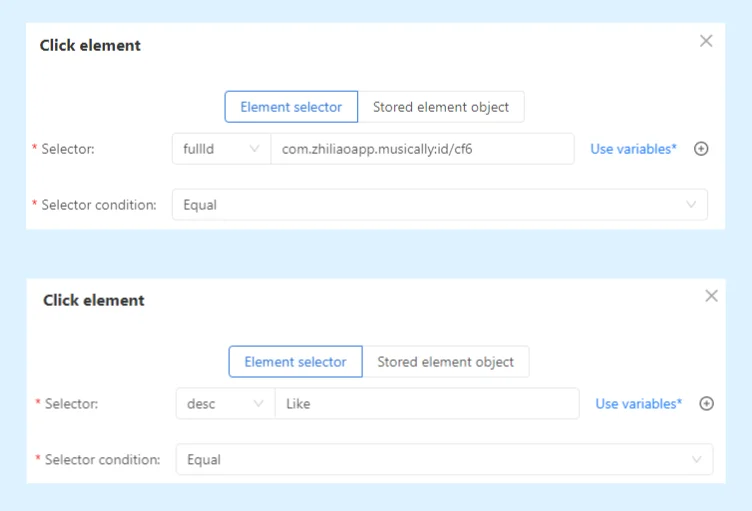
Tip: When you click on an attribute value, it will copy the text in the following format: fullId(“com.zhiliaoapp.musically:id/cf6”), className(“android.widget.ImageView”). You only need to fill in the value inside the quotes.
Step 6: Don’t forget to debug the template and check if the template is running correctly.
Exercise
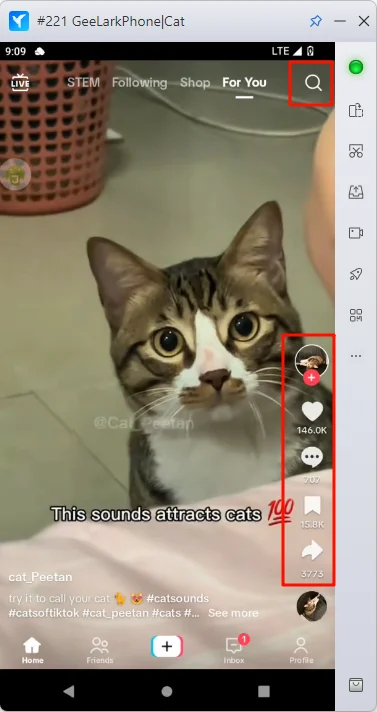
Please create an RPA template to click the icon marked with a red box in the image below. Through this template, you will learn how to use the fullId and desc selectors to locate elements. It’s recommended to click only one icon at a time and practice using AutoX.js to find the corresponding fullId or desc attribute of the widget.
Be sure to use “View in layout hierarchy” frequently. Many elements are nested, and if you find that many attribute values are empty, it’s likely that you haven’t found the correct element.
Selector Usage Examples
There are two common scenarios for using the className selector:
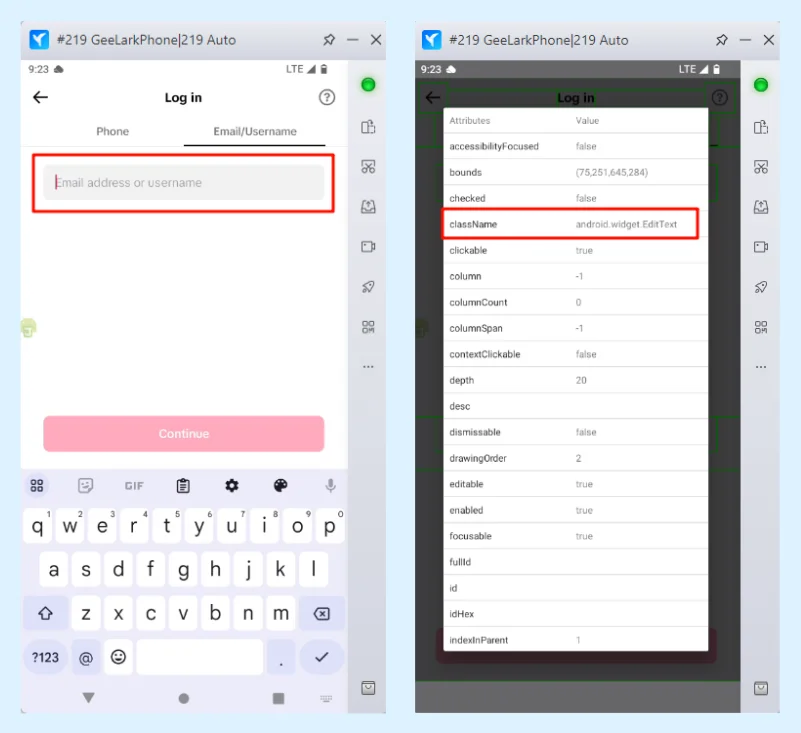
1.Unique Attribute Value: When the className attribute value is unique, you can directly use it to precisely locate the control. For example, in the scenario shown in the image below, the className of the input field is “android.widget.EditText”. From “EditText”, you can tell that this is a text input element. Since there’s only one input field on this screen, it’s perfectly fine to use the class selector to locate the element.

Assistive Targeting: Combine the className selector with other selectors to narrow down the search scope.
For example, locate a widget with a className value of com.ui.editText and a desc value of username. This combination allows you to identify the target widget more precisely.

3.4 Coordinate-Based Method (Click on Coordinates)
Sometimes, text or attribute-based method may fail to accurately locate an element. In such cases, you can use screen coordinates to pinpoint the exact location of the element in GeeLark RPA.
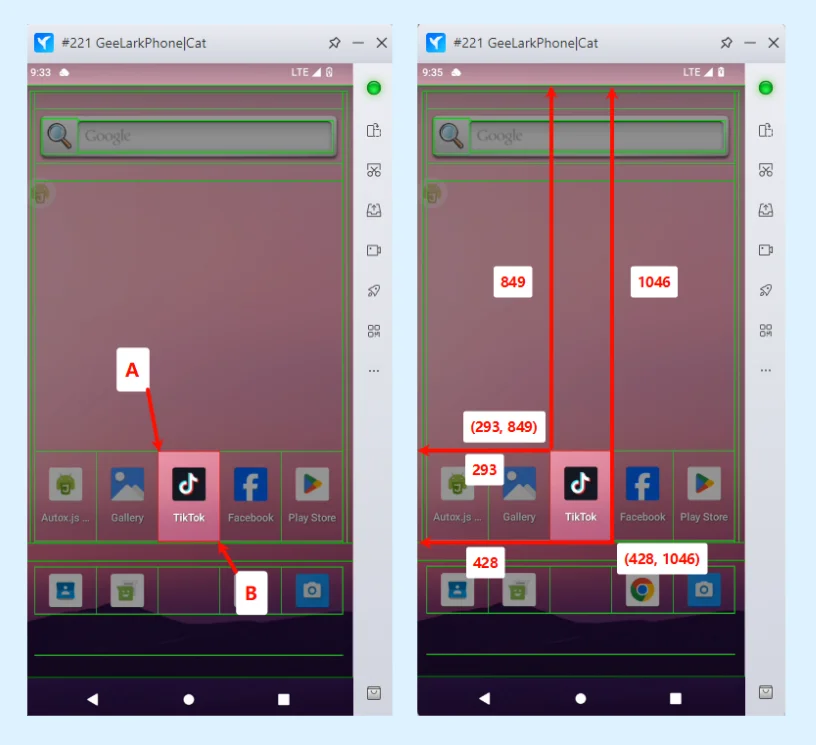
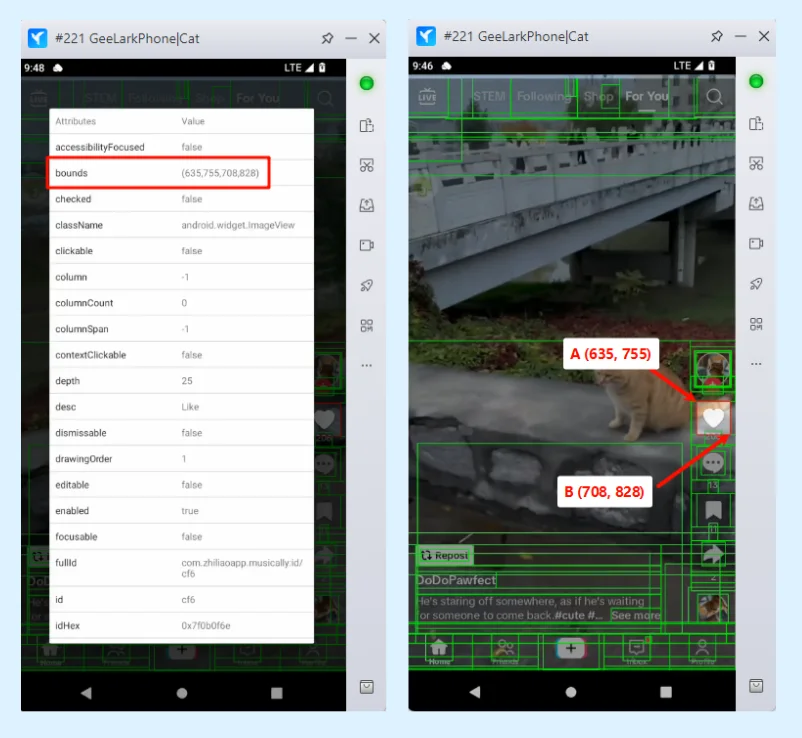
Before proceeding, let’s first understand the coordinate system of Android devices. As shown in the diagram, points A and B are represented by their coordinates (X, Y).
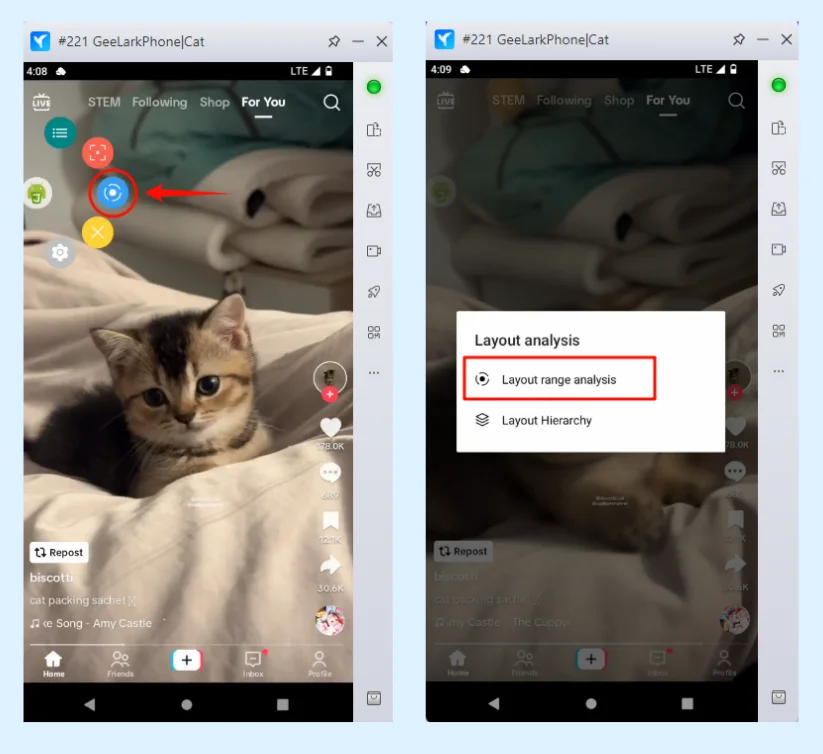
Step 1: Tap the AutoX.js floating icon, then select the blue “Layout analysis” option. After that, choose “Layout range analysis.”
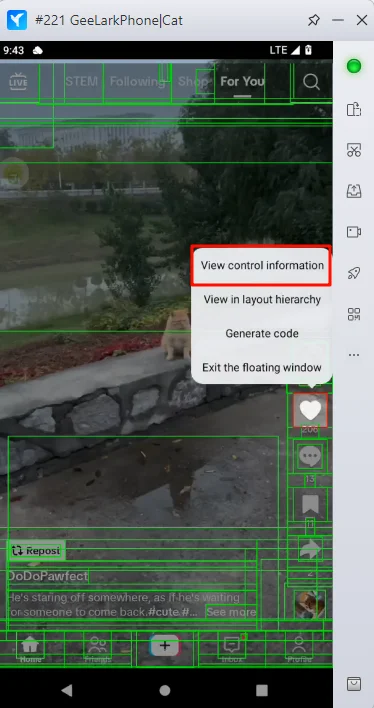
Step 2: Click the “Like” icon, then select “View control information” from the menu.
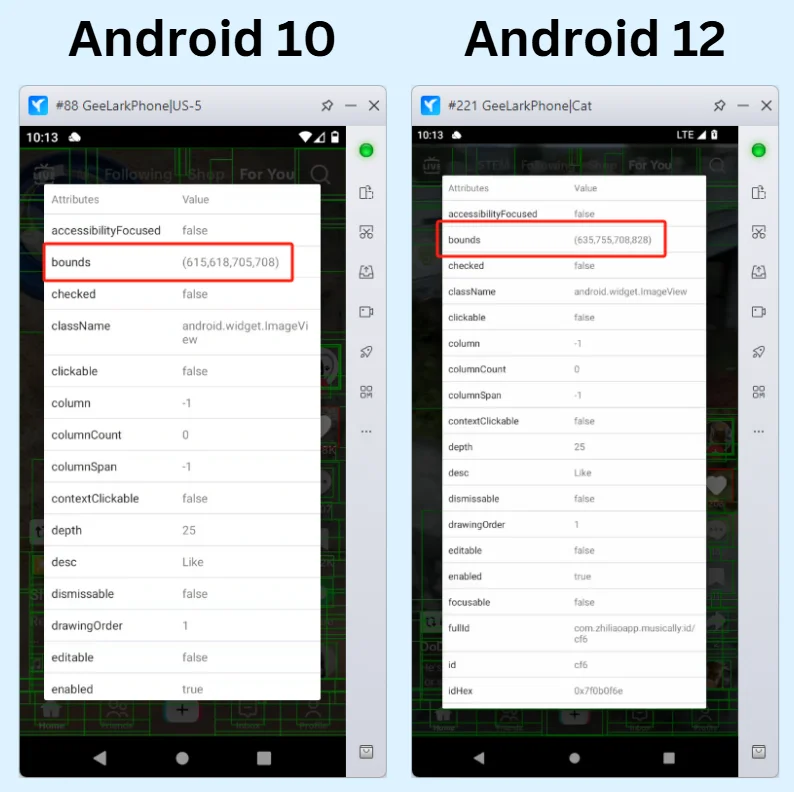
Step 3: In the bounds attribute, you’ll see (635, 755, 708, 828). These represent the coordinates of the selected element’s top-left corner (Point A) and bottom-right corner (Point B).
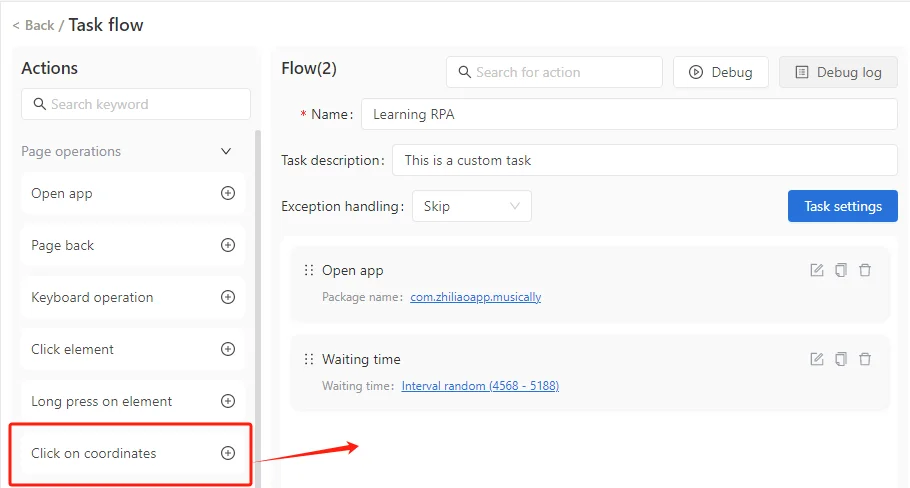
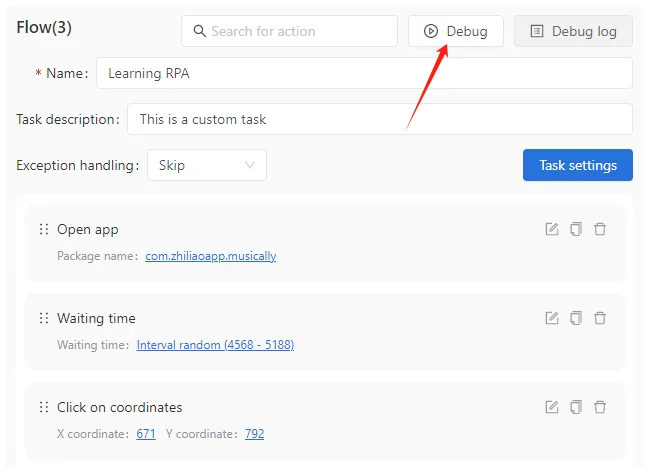
Step 4: Set up the simplest test flow by selecting the “Click by Coordinates” action in Step 3.
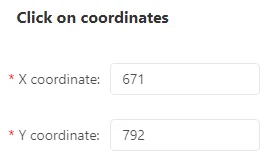
So, how should you fill in the X and Y coordinates for “Click on coordinates”? If we want the RPA to click precisely on the center of the image (indicated by the blue arrow), we need to calculate the center point.
The bounds attribute provides the coordinates of two corners (Point A and Point B). If you use either the A or B point coordinates, it may cause accidental clicks on other elements.
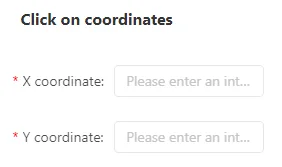
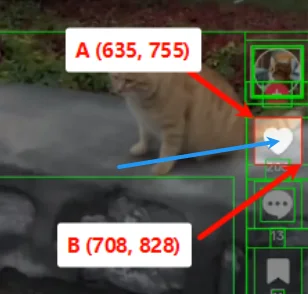
In fact, you can easily calculate the center point coordinates. For example, if Point A’s X coordinate is 635 and Point B’s X coordinate is 708, the center point’s X coordinate would be: X = (635 + 708) / 2 = 671.5. Similarly, the Y coordinate is: Y = (755 + 828) / 2 = 791.5. Since RPA coordinates must be integers, you would round this to X = 671, Y = 791.
If you don’t want to calculate precisely, you can estimate the center point roughly. For example, X = 655, Y = 800 or X = 660, Y = 792. As long as the coordinates fall within the target widget’s area and won’t accidentally click on other elements, it’s good enough.
Step 5: Finally, debug the template.
Attention!
Due to variations in screen resolutions across different cloud phone systems, the coordinates of the same widget may differ between devices. For example, if your RPA process clicks the “Like” icon on Android 10, using the same coordinates on Android 12 might accidentally click the “Comment” icon instead.
To ensure the stability of your template, it’s recommended to:
- Prioritize text or attribute-based selectors whenever possible.
- If using coordinate-based targeting, test the coordinates on multiple cloud phone systems with different versions to verify accuracy.
- Add a margin of error to the coordinates to avoid accidental clicks on nearby widgets.
Once you’ve mastered text-based, attribute-based, and coordinate-based method, you should be more comfortable using AutoX.js and building simple RPA templates in GeeLark RPA. From now on, I’ll skip over some of the basic steps and focus on explaining the use cases of different operation options and the purpose of their settings. I will only go into more detail with examples when an operation option is more complex.
Next, as you learn each new operation option, add it to your template and practice using it to understand how it works. This practice will surely improve your GeeLark RPA skills.
4.Long Press on Element
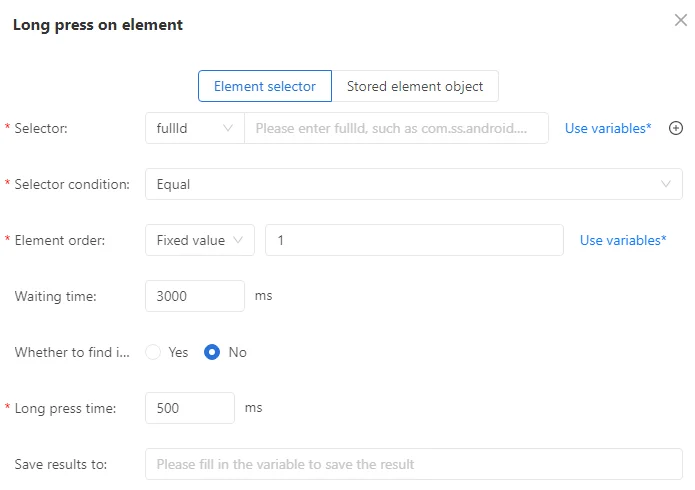
Use Case: This is used to simulate a long press on a screen element, typically for triggering special functions, such as opening a menu or dragging a widget.
| Option | Description |
| Selector | fullId: Uses the unique ID of the element for precise location. text: Locates elements based on displayed text, suitable for elements with clear visible text. desc: Locates elements based on their description, ideal for icon-like controls. className: Locates elements by their class name. This works only if the class name is unique, and it’s often used in combination with other selectors. |
| Selector condition | Equals: Matches the attribute value exactly, suitable for elements with fixed values. Contains: Matches part of the attribute value, suitable for elements with dynamic text or descriptions. |
| Element order | Fixed Value: Selects the specific target element by its position in the list of matching elements. Interval Random: Randomly selects an element from a specified range of matching elements. |
| Waiting time | Specifies the maximum time (in milliseconds) to wait while searching for the target element. If the page loads slowly, increase this wait time (e.g., 5000ms). |
| Whether to find invisible elements | Controls whether the action can target elements that are not visible on the screen (e.g., hidden elements or content that requires scrolling). Select “Yes” to click buttons that require scrolling to become visible. Select “No” to interact only with elements currently visible on the screen. Typically, we long press the current screen content, so you can leave the default option set to “No”. |
| Save results to | The primary purpose is to record whether the click action was successful. The result is stored in a boolean variable:true: Click was successful.false: Click failed. |
| Notes | Add comments to document the purpose or function of this step, making it easier to review or debug later. |
5.Long Press the Coordinates
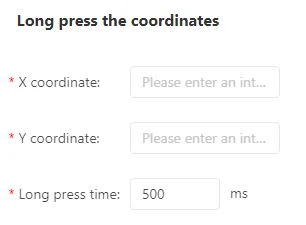
Similar to “Long Press Element”, this option targets the element using coordinates instead. For information on how to fill in the X and Y coordinates, please read “3.4 Coordinate-Based Method”.
6.Enter Content
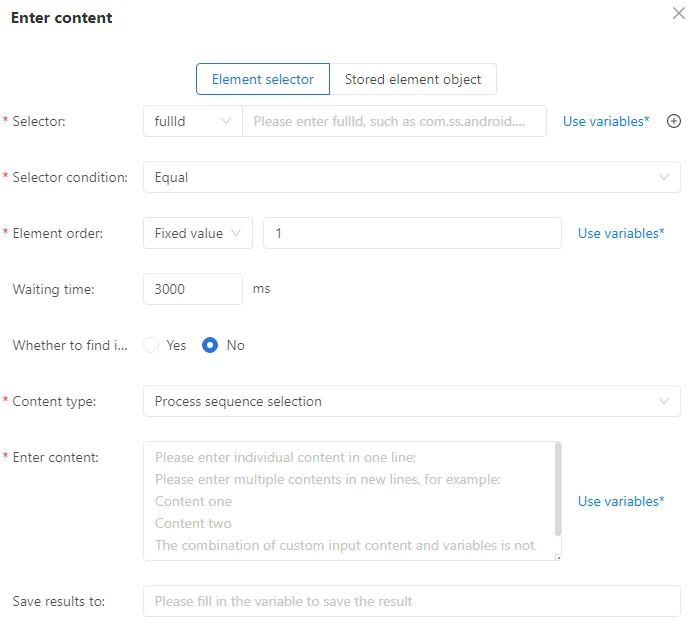
Use Case: This is used to enter text into a specified input field or text box, such as a username, password, or search keyword. With this feature, GeeLark RPA can automatically complete tasks like filling out forms or performing searches.
| Option | Description |
| Selector | fullId: Uses the unique ID of the element for precise location. text: Locates elements based on displayed text, suitable for elements with clear visible text. desc: Locates elements based on their description, ideal for icon-like controls. className: Locates elements by their class name. This works only if the class name is unique, and it’s often used in combination with other selectors. |
| Selector condition | Equals: Matches the attribute value exactly, suitable for elements with fixed values. Contains: Matches part of the attribute value, suitable for elements with dynamic text or descriptions. |
| Element order | Fixed Value: Selects the specific target element by its position in the list of matching elements. Interval Random: Randomly selects an element from a specified range of matching elements. |
| Waiting time | Specifies the maximum time (in milliseconds) to wait while searching for the target element. If the page loads slowly, increase this wait time (e.g., 5000ms). |
| Whether to find invisible elements | Controls whether the action can target elements that are not visible on the screen (e.g., hidden elements or content that requires scrolling). Select “Yes” to click buttons that require scrolling to become visible. Select “No” to interact only with elements currently visible on the screen. |
| Content Types | Sequence selection: Select content in order when there are multiple input steps within a single environment. Environment order selection: Select content in the order of input for each environment. Randomly selected: Select content randomly from the provided inputs. |
| Save results to | The primary purpose is to record whether the click action was successful. The result is stored in a boolean variable:true: Click was successful.false: Click failed. |
| Notes | Add comments to document the purpose or function of this step, making it easier to review or debug later. |
7.Keyboard Opertaion

Use Case: This is used to simulate pressing a specific key on the keyboard, such as submitting a form or clearing the text box content. It’s commonly used for quick actions or content processing after input in GeeLark RPA.
| Option | Description |
| Keyboard Keys | Simulate pressing the “Enter” or “Delete” keys. This is used to confirm actions or delete content in a text box. |
8.Wait for Element to Appear
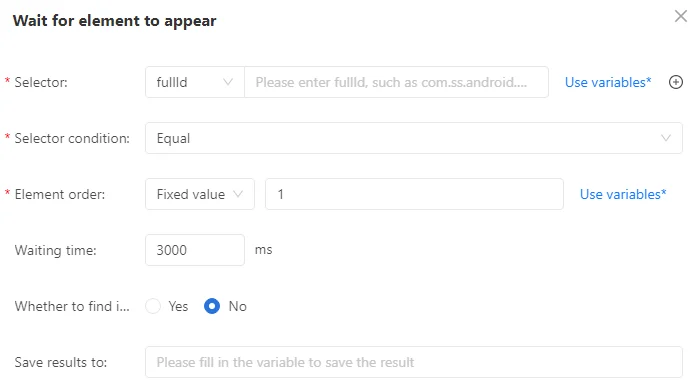
Use Case: This is used to wait for a specific element (such as a button or text box) to appear, ensuring that the page has fully loaded before proceeding with the next action in GeeLark RPA.
| Option | Description |
| Selector | fullId: Uses the unique ID of the element for precise location. text: Locates elements based on displayed text, suitable for elements with clear visible text. desc: Locates elements based on their description, ideal for icon-like controls. className: Locates elements by their class name. This works only if the class name is unique, and it’s often used in combination with other selectors. |
| Selector condition | Equals: Matches the attribute value exactly, suitable for elements with fixed values. Contains: Matches part of the attribute value, suitable for elements with dynamic text or descriptions. |
| Element order | Fixed Value: Selects the specific target element by its position in the list of matching elements. Interval Random: Randomly selects an element from a specified range of matching elements. |
| Waiting time | Specifies the maximum time (in milliseconds) to wait while searching for the target element. If the page loads slowly, increase this wait time (e.g., 5000ms). |
| Whether to find invisible elements | Controls whether the action can target elements that are not visible on the screen (e.g., hidden elements or content that requires scrolling). Select “Yes” to click buttons that require scrolling to become visible. Select “No” to interact only with elements currently visible on the screen. |
| Save results to | The primary purpose is to record whether the click action was successful. The result is stored in a boolean variable:true: Click was successful.false: Click failed. |
| Notes | Add comments to document the purpose or function of this step, making it easier to review or debug later. |
Today’s content is quite a lot, so take your time to go through it. You can try using the actions we’ve discussed to create an RPA template in GeeLark RPA and see if it works for your business needs.
GeeLark RPA Guide for Beginners ( 1 )
GeeLark RPA Guide for Beginners ( 2 )
GeeLark RPA Guide for Beginners ( 3 )
GeeLark RPA Guide for Beginners ( 5 )
