GeeLark RPA Guide for Beginners ( 6 )
GeeLark RPA Guide for Beginners ( 1 )
GeeLark RPA Guide for Beginners ( 2 )
GeeLark RPA Guide for Beginners ( 3 )
Welcome to the GeeLark RPA Guide! Well, well, I didn’t expect you to make it this far! I’m really impressed! Now that you’re here, let’s learn some advanced techniques. In this chapter, we’ll cover things like logic checks, loops, and more—basically solving the issues we left off in the last section. This guide aims to help you navigate through the complexities of RPA using GeeLark’s powerful features.
This chapter might feel a bit tricky, but don’t worry—practice is the best way to learn. I’ll break everything down as simply as I can to help you through each challenge. Let’s jump in and get started!
1. Upload File in GeeLark RPA
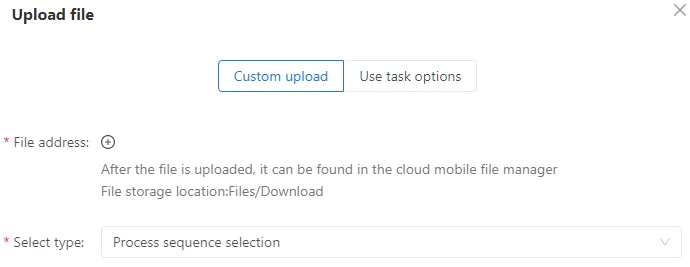
Use case: This function within the GeeLark RPA Guide is used to upload local files to the cloud phone. It’s especially useful for automating tasks that need to read files from the local system and transfer them to the cloud phone environment, like uploading images, documents, or any other files that need to be processed on the cloud phone.
| Option | Description |
| File address | Choose the file(s) you want to upload. Multiple files can be selected. |
| Select type | Process sequence selection: Upload files in the order defined in the process. For example, file A is uploaded first, then file B. This is useful when the order of file uploads matters. Environment order selection: Upload files in the order specified for each environment. For example, file A is uploaded to Environment 1, then file B to Environment 2. This is suitable for scenarios where file uploads need to be performed in different environments sequentially. Randomly selected: Randomly select a file to upload from the available files. For example, each time the process runs, it might randomly choose between file A, B, or C. This is useful when the order of upload doesn’t matter, and a random file is fine. |
2. IF Condition in GeeLark RPA

IF Condition is a basic logical tool used in GeeLark RPA Guide to make decisions. It allows RPA to decide whether to perform an action based on set rules. Think of it as a “multiple-choice question”: depending on the condition’s result, RPA will perform different actions.
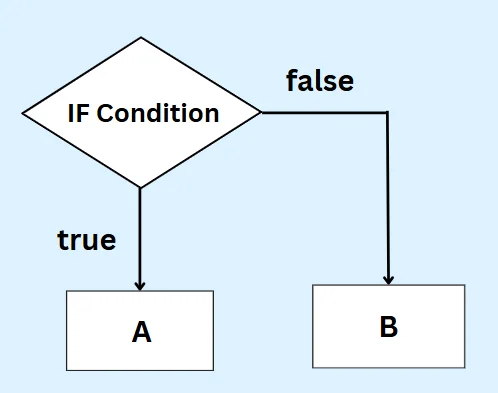
Use Case: In RPA, an IF condition helps you make decisions. For example, you can set it so that if a button exists in the app, RPA clicks it; if the button doesn’t exist, it will perform another action. In short, the IF condition makes your automation process more flexible and smarter.
Conditions
There are four main types of conditions, each suited for different scenarios:
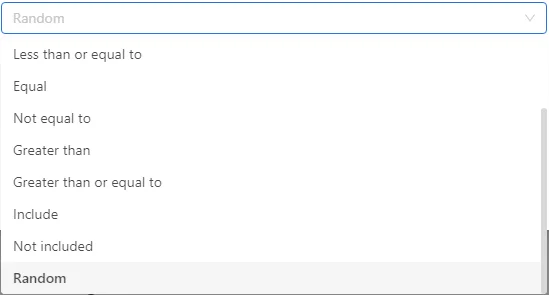
1. Exists / Does Not Exist:
Often used to check if a variable, text, icon, or element object is present.

2. Less Than / Less Than or Equal to / Equal to / Not Equal to / Greater Than / Greater Than or Equal to:
Used to compare the size or equality of two values, applicable for both text and numbers. For example, you can check if one number is greater than another or if a text matches a specific value.

3. Include / Not Include:
Used to check if a text variable includes a specific substring. This is useful for search operations, like checking if a product description contains a certain keyword. For example, you can check if the variable “title” contains the word “GeeLark.”

4. Random:
This sets a percentage to determine the likelihood of the IF condition being executed. For example, setting a 52% chance means the operation will happen about half the time, adding some uncertainty or simulating random events in the process.

3. For Loop Techniques in GeeLark RPA
When you need to automate repetitive tasks with RPA, the For loop is a key tool. In GeeLark RPA, there are 3 main types of For loops: For Loop Times, For Loop Elements, and For Loop Data.
3.1 For Loop Times in GeeLark RPA

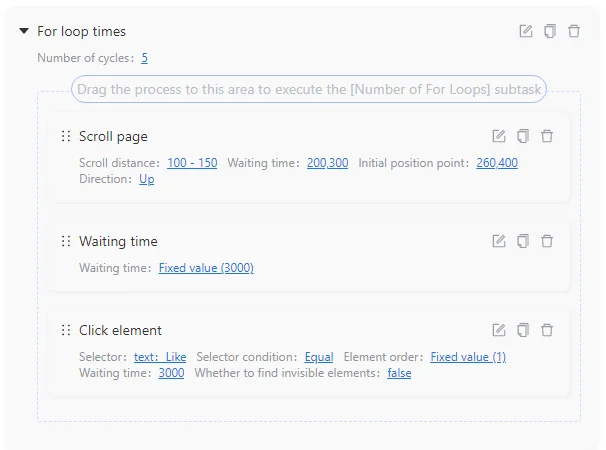
Use Case: By setting how many times to repeat, you can make the RPA repeat actions a certain number of times with the GeeLark RPA Guide. This is useful for tasks like scrolling the page 10 times or liking 5 videos. It saves you from setting each action separately and makes the process faster and easier to manage.
Add the actions you want to repeat into the “For loop times”:
3.2 For Loop Elements in GeeLark RPA
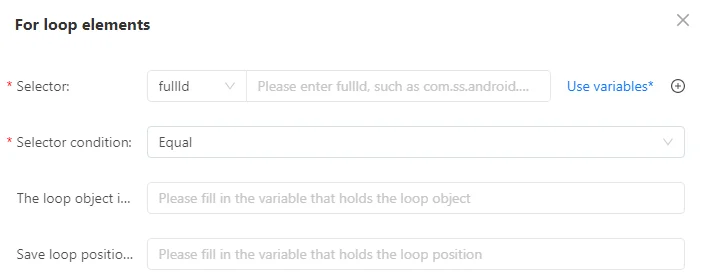
Look at the images below. There are some elements that are the same or similar (in the red boxes).
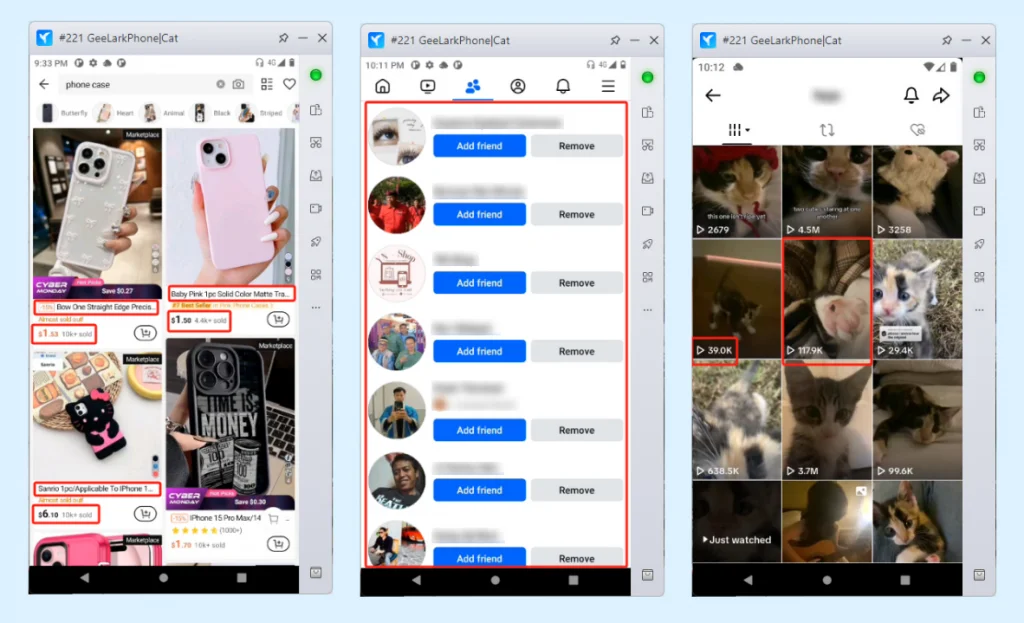
In the following scenarios, I will use the For Loop Elements:
- In Image 1, I need to get the title and price of each product.
- In Image 2, I want to click “Add friend” selectively and stop after 3 clicks.
- In Image 3, I need to go through each video and get the number of views for each one.
How to Use For Loop Elements?
1. Finding Elements with the Same Attributes
For example, on the TikTok profile page, I want to loop through the view counts of each video (Element A, B, C, …). First, I need to use a selector to match these elements with the same attributes. (I have already explained how to locate elements, so I won’t repeat that here.)
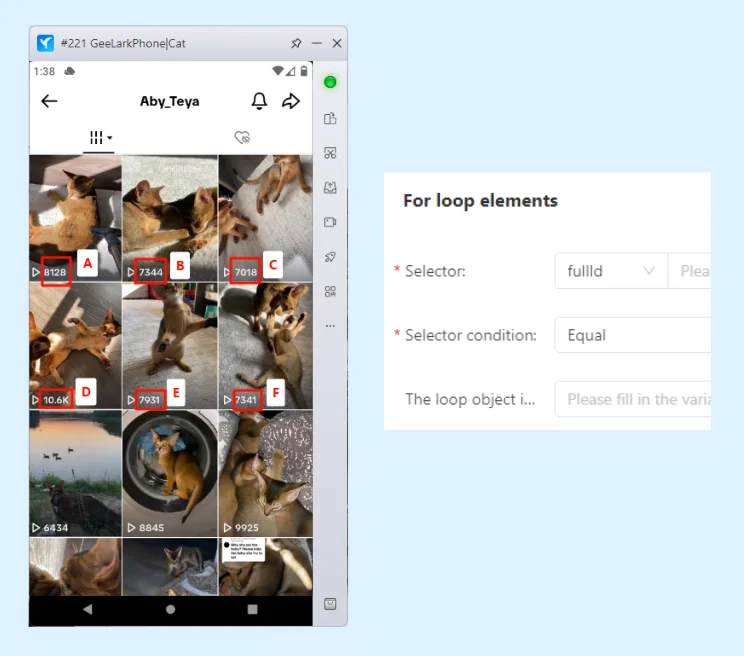
2. Save Variables During each loop, we can save the current element and its position as a variable. You can think of the loop position as the order, but keep in mind that the count starts from 1.
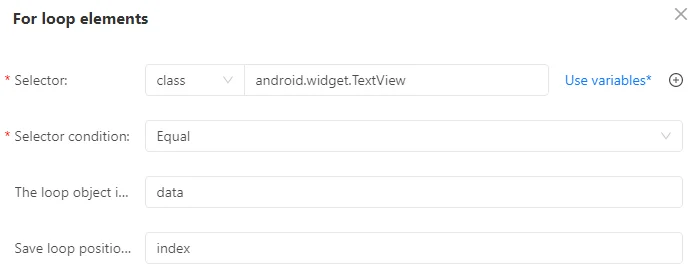
Example:
- In the first loop, when the script reaches element A, element A is saved as the variable
data, and the loop position is 1, so the index value is also 1. - In the second loop, when the script reaches element B, element B is saved as the variable
data, and the loop position is 2, so the index value is 2. - In the third loop, when the script reaches element C, element C is saved as the variable
data, and the loop position is 3, so the index value is 3. - And so on.

Note:
- Each time the loop runs, the saved variable value will replace the previous one.
- The variable data is an element object, and the variable index is a string.
- The “For loop elements” will only loop through visible elements on the current page that meet the conditions. It will not process invisible elements.
3. Using Variables Now, let’s see how we can use these two variables. Here are two examples:
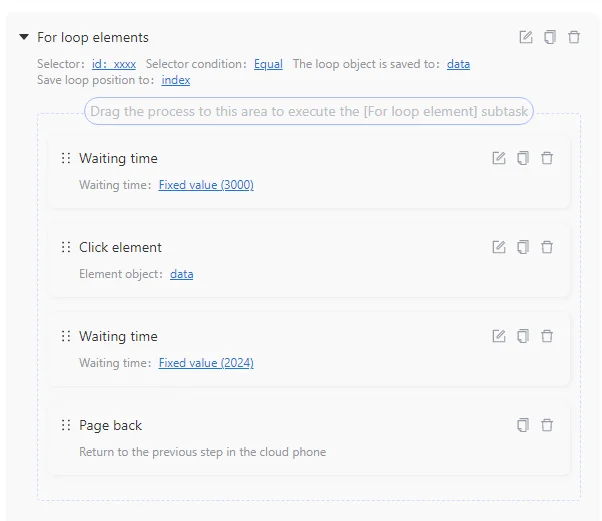
(1) In each loop, click on the video’s view count (elements A, B, C), watch it for a few seconds, then go back to the profile page and click on the next video.
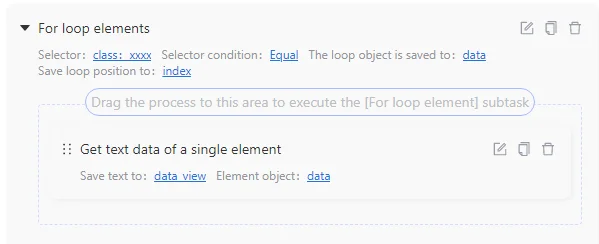
(2) I want to extract the text from each element in the loop. Since we’re looping through element objects, not strings, I need to get the text from each element. What to do with the extracted text is up to you.
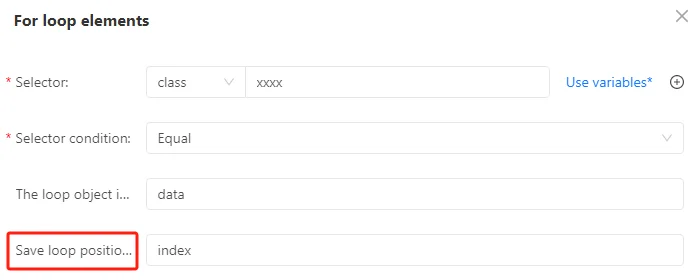
Save loop position to
“Save loop position To” is usually an optional field. You only need to fill it in if you want to use the loop position as a variable (for example, to perform a certain action when the loop reaches a specific position). If the loop position doesn’t affect your process, you can leave it blank.
3.3 For Loop Data in GeeLark RPA
Feynman is working hard to bring it to life!
Thanks for your patience!
You may refer to another material for further reading on advanced for loop techniques.
4. Exit Loop in GeeLark RPA

Use Case: This option lets you stop a loop early when a specific condition is met. It’s useful when you want to halt further loop operations as soon as certain conditions are encountered, ensuring efficiency in your RPA processes.
You’ll often use this action with “For loop elements”, “For loop times”, or “For loop data” to break out of the loop.
5. End Task in GeeLark RPA

The “End Task” action is used to immediately stop the current task. No matter what step the task is on, once the “End Task” action is triggered, the task will halt, and subsequent steps will not be executed, proving essential in managing workflow within the GeeLark RPA Guide.
6. Other Settings in GeeLark RPA
6.1 Task Settings in GeeLark RPA

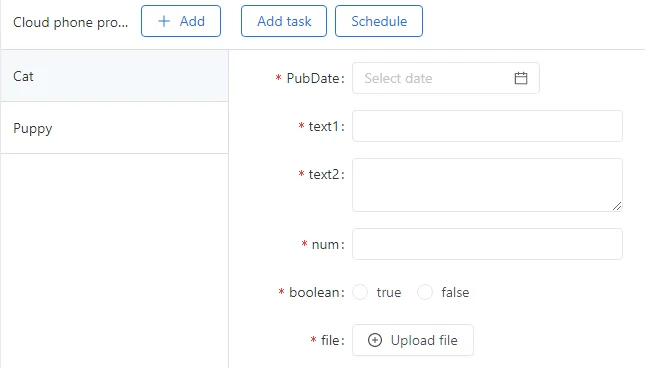
Use Case: This action allows you to define custom variables and use them within your RPA template, as highlighted in the GeeLark RPA Guide. You can define five types of variables: String (Text), Batch Text, Boolean, Number, and File.
How to Use Task Settings?
1. Create Variable: Choose the variable type (e.g., String, Number, Boolean, etc.), and then provide the variable name and default value.
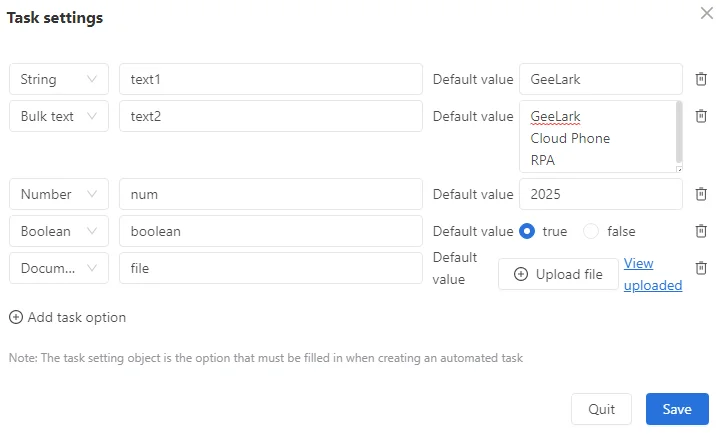
- String: Stores text data, like “Hello World” or “T-shirt.” It’s useful for inputting content or in text-based checks.
- Batch Text: Can store multiple pieces of text, ideal for looping scenarios.
- Number: Stores numerical data, used for inputting values or comparisons.
- Boolean: Stores true/false values, used for logic checks.
- File: Stores files, useful when you need to upload a file.
2. Using Variables: Once you’ve created a variable, you can reference it in various actions by selecting “Use Variable.” This integration is emphasized in this GeeLark RPA Guide.
For example, in the “Enter content” action, you can use your defined string variable to input the content.

3. Setting Values Before Publishing the Task: Before publishing the task, you can change the values of these variables at any time to suit different scenarios.
6.2 Exception Handling in GeeLark RPA
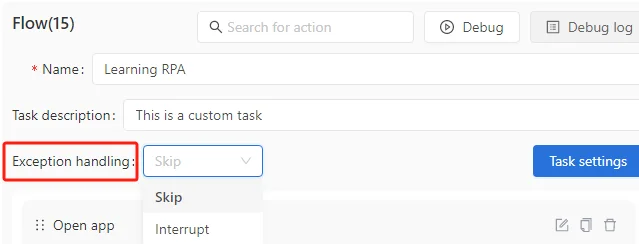
Use Case: During task execution, there might be situations where certain actions fail. GeeLark RPA provides two exception handling options to help control the flow of the task.
Skip:
If a problem occurs during task execution (e.g., a failed click on an element), you can choose to “skip” that step. The task will continue with the following actions. This is useful when you want the task to keep running even if some steps fail, allowing other logic to proceed.
Interrupt:
If a step fails, you can choose to “interrupt” the task. The task will stop immediately, and no subsequent actions will be performed. This is suitable for scenarios where the task must complete all steps successfully, and any failure should terminate the entire task, as detailed in the GeeLark RPA Guide.
Congratulations! You’ve now completed your GeeLark RPA Guide training and mastered the skills to build complex RPA templates using advanced features.
Now comes the practice part! Only through hands-on experience can you truly become proficient in using what you’ve learned.
Of course, GeeLark RPA will continue to improve and update its features. I’m confident that no matter how the features evolve, you’ll be able to adapt easily. Go ahead and start using GeeLark RPA to boost your productivity!
If you ever run into any challenges or need a refresher, feel free to return and review this guide. I’ll always be here waiting to help!
GeeLark RPA Guide for Beginners ( 1 )
GeeLark RPA Guide for Beginners ( 2 )
GeeLark RPA Guide for Beginners ( 3 )
GeeLark RPA Guide for Beginners ( 4 )
